Lateral Ankle Injury Rehabilitation
Important information:
A rehabilitation program begins in the first few days following an ankle injury after the most severe initial symptoms have subsided. Rehabilitation promotes the return of strength, function, and comfort. Appropriate rehabilitation programs reduce the recurrence of ankle sprains. Rehabilitation programs focus on restoring ankle range of motion, strength, balance, agility and endurance. For effective rehabilitation, all these factors need to be addressed. This teaching sheet will describe a series of exercises specific to these areas. Your clinician will instruct you on your specific progression for rehabilitation.
Patient instructions: Phase 1
Watch a video of how to perform these exercises:
Range of motion
Rehabilitation begins first with a series of exercises to restore range of motion of the ankle joint. These exercises keep the injured ankle from becoming stiff. Perform at least 3 times daily.
Perform range of motion exercises as far as you can without discomfort.
-
Active range of motion: Move foot up and down as far as comfortably possible 30 times (A1). Move foot in and out as far as comfortably possible, without moving leg, 30 times (A2).
-
Circles: Move ankle in a comfortable circular motion 30 times in each direction (B).
-
Alphabet: In a seated position, with your leg still, trace capital letters of the alphabet with your big toe. Repeat 3 times (C).
-
Calf stretch: Face a wall. Step back with the injured foot making sure the heel can touch the ground. Lean into the wall until a stretch is felt in the calf. Make sure the third toe is pointing directly towards the wall in front. Hold for 30 seconds. Repeat 3 times (D).
Strength and balance
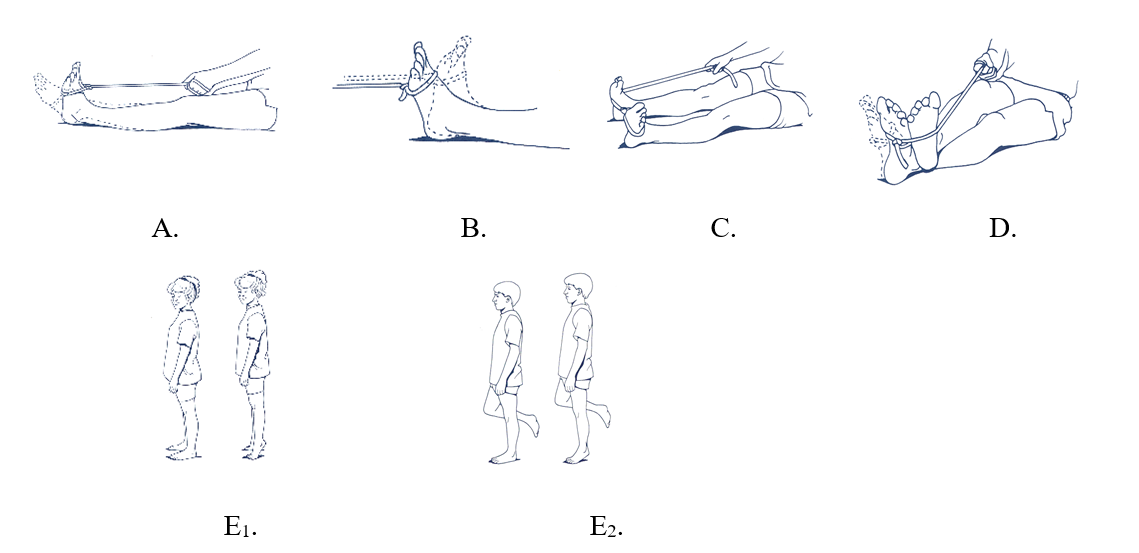
As range of motion is restored, you will begin strengthening the muscles surrounding the ankle. Perform 3 sets twice daily. Bands can be purchased at local sporting goods stores or online. Start with light resistance. Increase the repetitions of each exercise until you can perform each one 30 times. Then increase the resistance by using a stronger band. Once you can perform these exercises, you may discontinue the range of motion exercises from the previous section.

-
Band plantarflexion: With band positioned as shown, push foot downward pointing toes.
-
Band dorsiflexion: With band positioned as shown (tied to chair or someone holding the band for you), pull foot upward.
-
Band eversion: With band positioned as shown, push foot outward.
-
Band inversion: With band positioned as shown, pull foot inward.
-
Calf raises: In a standing position rise up onto the ball of both feet keeping your foot in a straight line with your leg. Repeat 10 repetitions for 3 sets.
E2. Balance: When you have normal range of motion and sufficient strength, try not to hold on to anything for balance. A good starting point is to balance on the affected leg. Try to maintain balance for 30 seconds and repeat 3 times. As you become more advanced you can close your eyes while performing this exercise.
 |
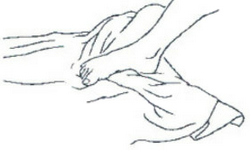
Towel curls: With foot resting on a towel on the floor, slowly bunch up the towel by curling the toes. Perform 10 repetitions for 3 sets |
Patient instructions: Phase 2
Criteria to advance to phase 2
-
Minimal swelling
-
Pain free during all phase 1 exercises
-
Walking without boot, cast, or brace if prescribed one
-
Ankle range of motion equal to the uninjured side
Watch a video of how to perform these exercises:
Agility and endurance
Progress to these exercises once you can perform strength and balance exercises comfortably. Perform these exercises 3-5 days per week.
Strength
Squat to calf raise: Stand with feet about shoulder width apart. Squat down until thigh is parallel to the floor. Return to standing while simultaneously rising onto ball of feet. Perform 10 repetitions for 3 sets.
Eccentric calf raises: Stand with feet shoulder width apart. With both feet, raise the heels off the ground. Lift uninjured foot off the ground, so you are standing on only the injured leg, and slowly lower the heel to the floor. Return to starting position with both feel shoulder width apart. If balancing is difficult, try holding on to a wall or sturdy chair. Perform 15 repetitions for 3 sets.
Single leg calf raises: Stand only on injured leg and lift the heel off the ground. Slowly lower the heel back to the ground. Perform 15 repetitions for 3 sets
Lateral toe walking: Step into an elastic exercise band and place just above the knees. Standing sideways with feet shoulder width apart, raise up your heels, so you are standing on the balls of your feet. Step to the side, 15 steps to the right and 15 steps to the left.
Lateral heel walking: Step into an elastic exercise band and place just above the knees. Standing sideways with feet shoulder width apart, lift your toes off the ground so all of your weight is on the heels. Step to the side, 15 steps to the right and 15 steps to the left. Your toes should stay off the ground the entire time.
Forward lunge: Step forward and bend both knees to about 90 degrees. Your back knee bends and drops towards the ground to almost touching. Stand by stepping back with the forward foot to return to the start position. Alternate feet stepping forward. Make sure the front knee does not pass in front of your toes when lunging forward. Perform 10 repetitions for 2 sets on each side
Side lunge: Start with feet shoulder width apart. Step to the side until your knee bends, no more than 90 degrees. Keep the other leg straight. When stepping, your hips should drop as if you are about to sit in a chair. Your knee should not pass in front of your toes. Stand by pushing off the leg that is bent to return to the start position. Perform 10 repetitions for 3 sets on each side
Plyometrics (Jumping)
Double leg jumping:
-
Forward and backward: Start with feet shoulder width apart and knees slightly bent. Hop forward, and then backwards, over an imaginary line, with both feet. Make sure to have a soft landing with your feet, and don’t let your feet turn out. Your feet should be even with each other and don’t let your knees turn inward. Perform 20 repetitions.
-
Side to side: Start with feet shoulder width apart and knees slightly bent. Hop to the side and then to the other side (left and right). Make sure to land softly and with knees in line with toes so they don’t turn inward. Perform 20 repetitions.
Single leg jumping:
-
Forward and backward: Stand on the injured leg and hop forward and then backward, over an imaginary line. Make sure to land softly on a bent knee. Your knees should stay in line with your toes so your knees do not turn inward. Perform 10 repetitions for 2 sets.
-
Side to side: Stand on the injured leg and hop from one side to the other (left and right), over an imaginary line. Make sure to land softly on a bent knee. Your knees should stay in line with your toes so your knees do not turn inward. Perform 10 repetitions for 2 sets.
Balance
Y-balance: Place 3 objects on the ground, about 2-3 feet apart. One in front of you, one behind you and slightly to the left, and one behind you and slightly to the right. Stand in the middle of the objects on your injured leg, with your hands on your hips. Bend the knee of the leg you are standing on, and reach with the other leg to an object, either in front of you, behind and to the right, or behind and to the left. Try to maintain your balance by reaching for each object and try not to let your foot touch the floor. Return to the start position once you have reached each object (1 repetition). Perform 5 repetitions.
Criteria to begin to return to sport:
-
You should be able to complete all of phase 2, pain free
-
There should not be able swelling in your ankle
-
You should be able to complete 25 single leg calf raises on your injured leg
-
Refer to www.chop.edu/sportsPT for additional return to sport resources
Once you can perform the above exercises on your injured leg only and have no pain you should begin to perform more active exercises. The goal is to gradually return to your pre-injury activity level. For instance, if you played sports, gradually return to sport specific activities such as running, jumping and cutting. The key is that you return gradually. When in doubt, less is better to prevent re-injury.
What happens if I don’t rehabilitate after an injury?
-
Weakness of supporting ankle ligaments
-
Recurrent ankle sprains or new injury
-
Possible osteoarthritis in later years
Following through with an organized rehabilitation program will help to possibly avoid these consequences.
Reviewed April 2024 by Kate Easby, ATC